A guide on how to set up and deploy a Telegram bot as a Lambda function for free, using Terraform.
Table of contents
Open Table of contents
Introduction
Recently, I’ve had an idea to create a Telegram bot that would notify me when stocks that I am interested in have a significant change in price. I wanted to have a simple way to keep track of the stocks that I am interested in without having to check the stock market every day.
This is just my use case, but you can adapt this guide to any other use case that you might have in mind.
Prerequisites
Before we start, make sure you have the following:
- An
AWS accountwith free tier activated Terraforminstalled on your machine. You can find the installation instructions here For macOS users, you can install Terraform using Homebrew:brew install terraform- AWS
CLIinstalled on your machine. You can find the installation instructions here For macOS users, you can install the AWS CLI using the following commands:curl "https://awscli.amazonaws.com/AWSCLIV2.pkg" -o "AWSCLIV2.pkg" sudo installer -pkg AWSCLIV2.pkg -target / - Python, GO, or any other programming language that you are comfortable with. In this guide, I will use
Pythonto create the logic of the Lambda function. - For easier development and deployment, also install
makeon your machine. You can find the installation instructions here For macOS users, you can installmakeusing Homebrew:brew install make - A
Telegramaccount
Create the actual Telegram bot
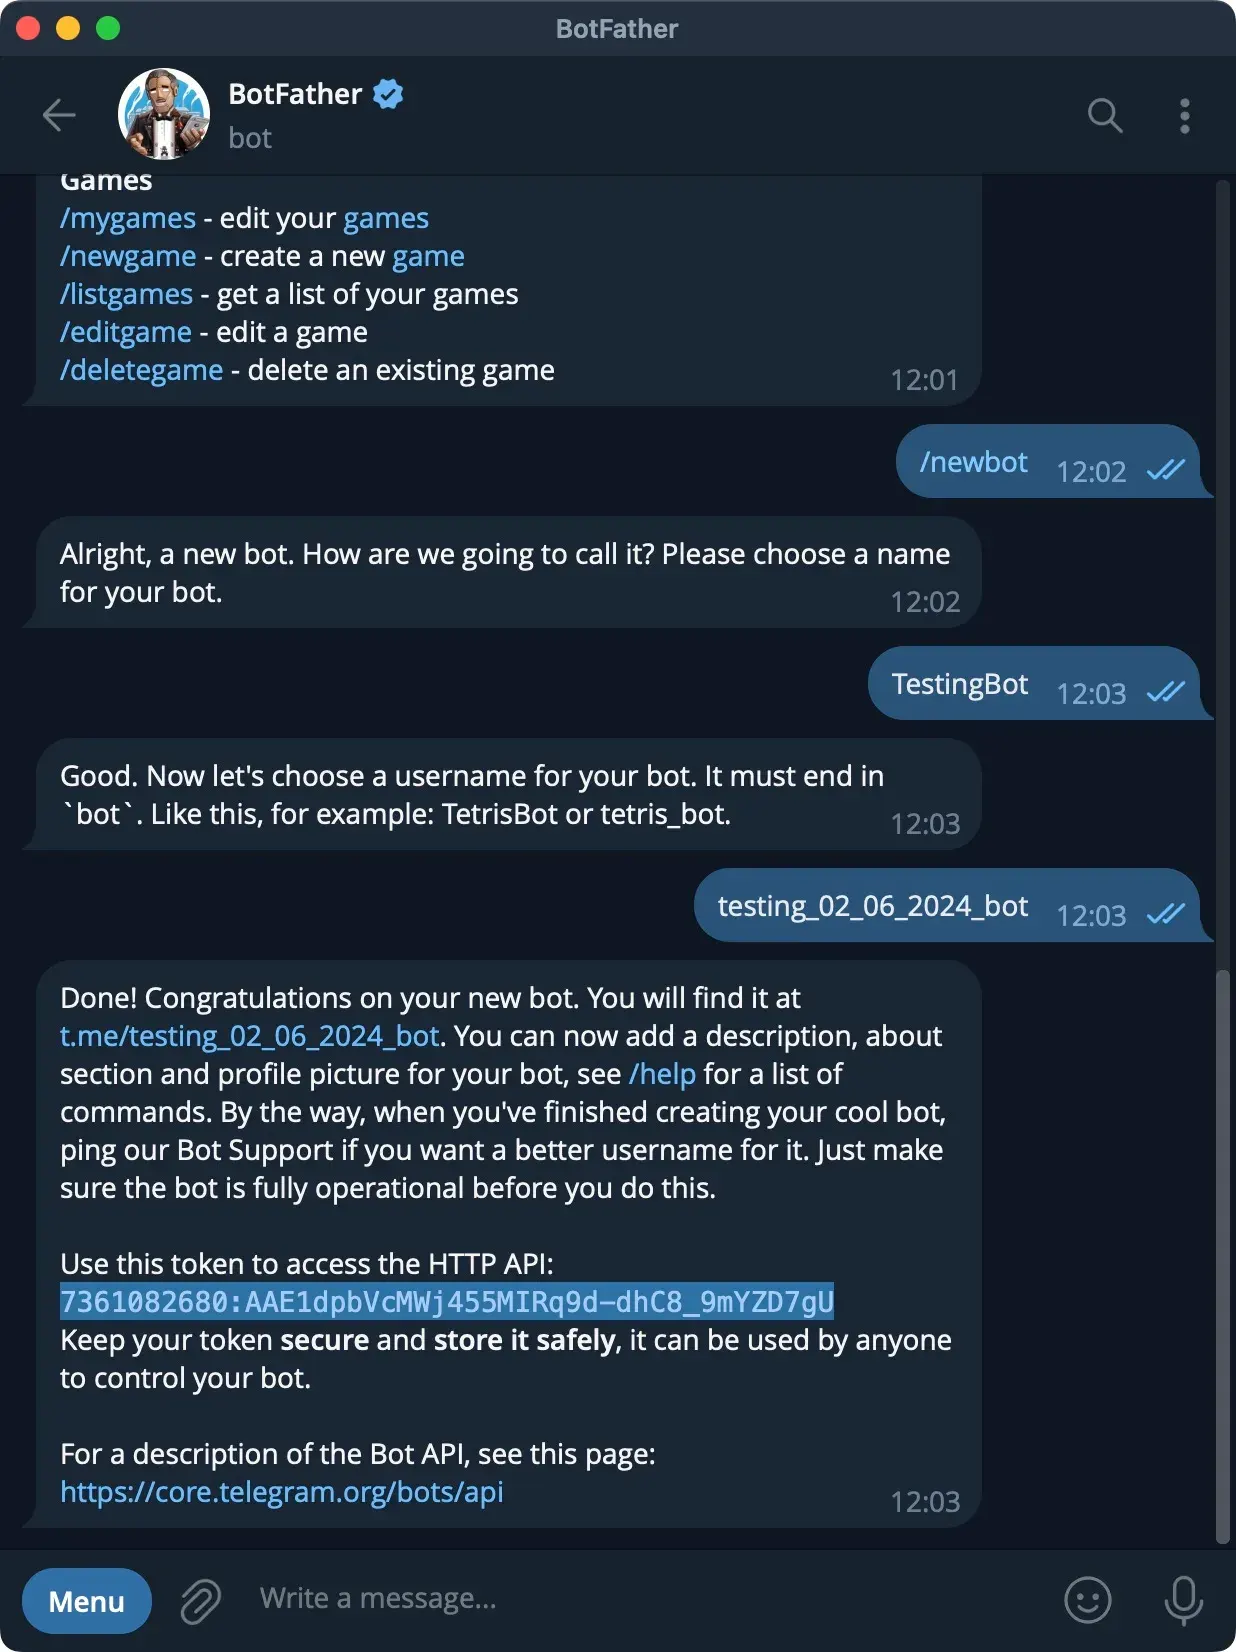
The first step is to create a new bot using the BotFather on Telegram. You can find the BotFather by searching for it on Telegram.
Just start a new chat with this Bot and type /newbot. The BotFather will guide you through the process of creating a new bot.
After the bot is created, you will receive a token that you will need later, so make sure to save it.
You can see an example of how to create a new bot using the BotFather in the image below:
Create your project
Handler
Create a new directory on your machine where you will store all the necessary files for this project.
You can name this directory telegram_bot. In this directory, create a new directory named code.
Inside the code directory, create a new file named lambda_function.py. This file will contain the logic of the Lambda function.
It must also declare the lambda_handler function, which is the entry point for the Lambda function.
For this example, I tried to keep it simple and only send back the message that the users send. If you want the logic of
the stock prices change, you can check the GitHub repository here.
Here is the content of my lambda_function.py file:
import boto3
import requests
import json

secretsmanager = boto3.client('secretsmanager')

def get_secret(secret_name):
    try:
        response = secretsmanager.get_secret_value(SecretId=secret_name)
        secret = json.loads(response['SecretString'])
        return secret
    except Exception as e:
        print(f"Error retrieving secret: {e}")
        return None

# Retrieve the Telegram token from Secrets Manager
secrets = get_secret("telegram/bot_token")

TELEGRAM_TOKEN = secrets.get('TELEGRAM_TOKEN') if secrets else None
TELEGRAM_API_URL = f"https://api.telegram.org/bot{TELEGRAM_TOKEN}/" if TELEGRAM_TOKEN else None


def lambda_handler(event, context):
    if 'body' in event:
        try:
            body = json.loads(event['body'])
            if 'message' in body:
                chat_id = body['message']['chat']['id']
                text = body['message']['text']
                send_message(chat_id, text)
        except json.JSONDecodeError:
            print("Failed to decode JSON body")
    else:
        # Check if the event is coming from EventBridge
        if 'source' in event and event['source'] == 'aws.events':
            #Do something else when event is from EventBridge
            print("Event from EventBridge")
        else:
            print("Unhandled event type")
            return {
                'statusCode': 400,
                'body': json.dumps('Bad Request')
            }

    return {
        'statusCode': 200,
        'body': json.dumps('Success')
    }


def send_message(chat_id, text):
    url = TELEGRAM_API_URL + "sendMessage"
    payload = {'chat_id': chat_id, 'text': text, 'parse_mode': 'Markdown'}
    try:
        response = requests.post(url, json=payload)
        response.raise_for_status()
    except requests.RequestException as e:
        print(f"Error sending message: {e}")
This repo contains also the configs for EventBride, to trigger the lambda function periodically on Stock Market opening hours and it also saves the stocks registered by the users in DynamoDB and sends notifications to all the users.
requirements.txt
Create a new file named requirements.txt in the same directory. This file will contain the dependencies that the Lambda function needs to have installed.
my file:
requests
boto3
urllib3==1.26.6
finnhub-python
Note: The
finnhub-pythonpackage is used to get the stock prices. Theboto3package is used to interact with AWS services.
Makefile
Create a new file named Makefile in the same directory. This file will contain the commands that we will use to build and deploy the Lambda function.
Here is the content of my Makefile that you can also use:
# This creates the AWS resources defined in the terraform file
apply:
	terraform init
	terraform apply -auto-approve

# This command is used to zip the code and upload it to S3
zip-code:
	zip -r telegram_bot.zip ./code/*
	aws s3 cp telegram_bot.zip s3://telegram-bot-lambda-bucket/telegram_bot.zip

# This command is used to install the dependencies that will be used as a layer for the lambda function and upload them to S3
zip-layer:
	pip3 install --no-cache-dir -r ./code/requirements.txt -t ./python
	zip -r python.zip ./python/*
	aws s3 cp python.zip s3://telegram-bot-lambda-bucket/python.zip
	terraform apply -auto-approve
Terraform
This file is used to create the necessary resources for the Lambda function. As I previously said, I will keep it simple and only create the Lambda function. If you want the full example, checkout the GitHub repository.
Create a new file named main.tf in the root directory. This file will contain the Terraform configuration for the Lambda function.
Here is the content of my main.tf file:
provider "aws" {
  region = "eu-central-1"
}

resource "aws_iam_role" "lambda_role" {
  name = "lambda_role"

  assume_role_policy = jsonencode({
    Version = "2012-10-17",
    Statement = [{
      Effect = "Allow",
      Principal = {
        Service = "lambda.amazonaws.com"
      },
      Action = "sts:AssumeRole"
    }]
  })
}

resource "aws_iam_role_policy_attachment" "lambda_policy" {
  role       = aws_iam_role.lambda_role.name
  policy_arn = "arn:aws:iam::aws:policy/service-role/AWSLambdaBasicExecutionRole"
}

resource "aws_s3_bucket" "lambda_bucket" {
  bucket = "telegram-bot-lambda-bucket"
}

resource "aws_lambda_function" "telegram_bot" {
  s3_bucket        = aws_s3_bucket.lambda_bucket.bucket
  s3_key           = "telegram_bot.zip"
  function_name    = "telegram_bot"
  role             = aws_iam_role.lambda_role.arn
  handler          = "lambda_function.lambda_handler"
  runtime          = "python3.8"
  timeout          = 60
}

resource "aws_lambda_layer_version" "my_layer" {
  layer_name = "my-bot-layer"
  s3_bucket        = aws_s3_bucket.lambda_bucket.bucket
  s3_key           = "python.zip"
  compatible_runtimes = ["python3.8"]
}
Deploy the Lambda function and layer
Now that we have all the necessary files and configurations, we can deploy the Lambda function. First, configure your AWS CLI by running the following command:
aws configure
If you don’t manage to configure it, check out this YouTube tutorial: AWS CLI Configuration
Then, you need to run the following command to create the necessary resources in AWS:
make apply
After the resources are created, you can run the following command to zip the code and the layer and upload them to S3:
make zip-code
make zip-layer
After the code and the layer are uploaded to S3, you can go to the AWS console and check if the Lambda function was created successfully.
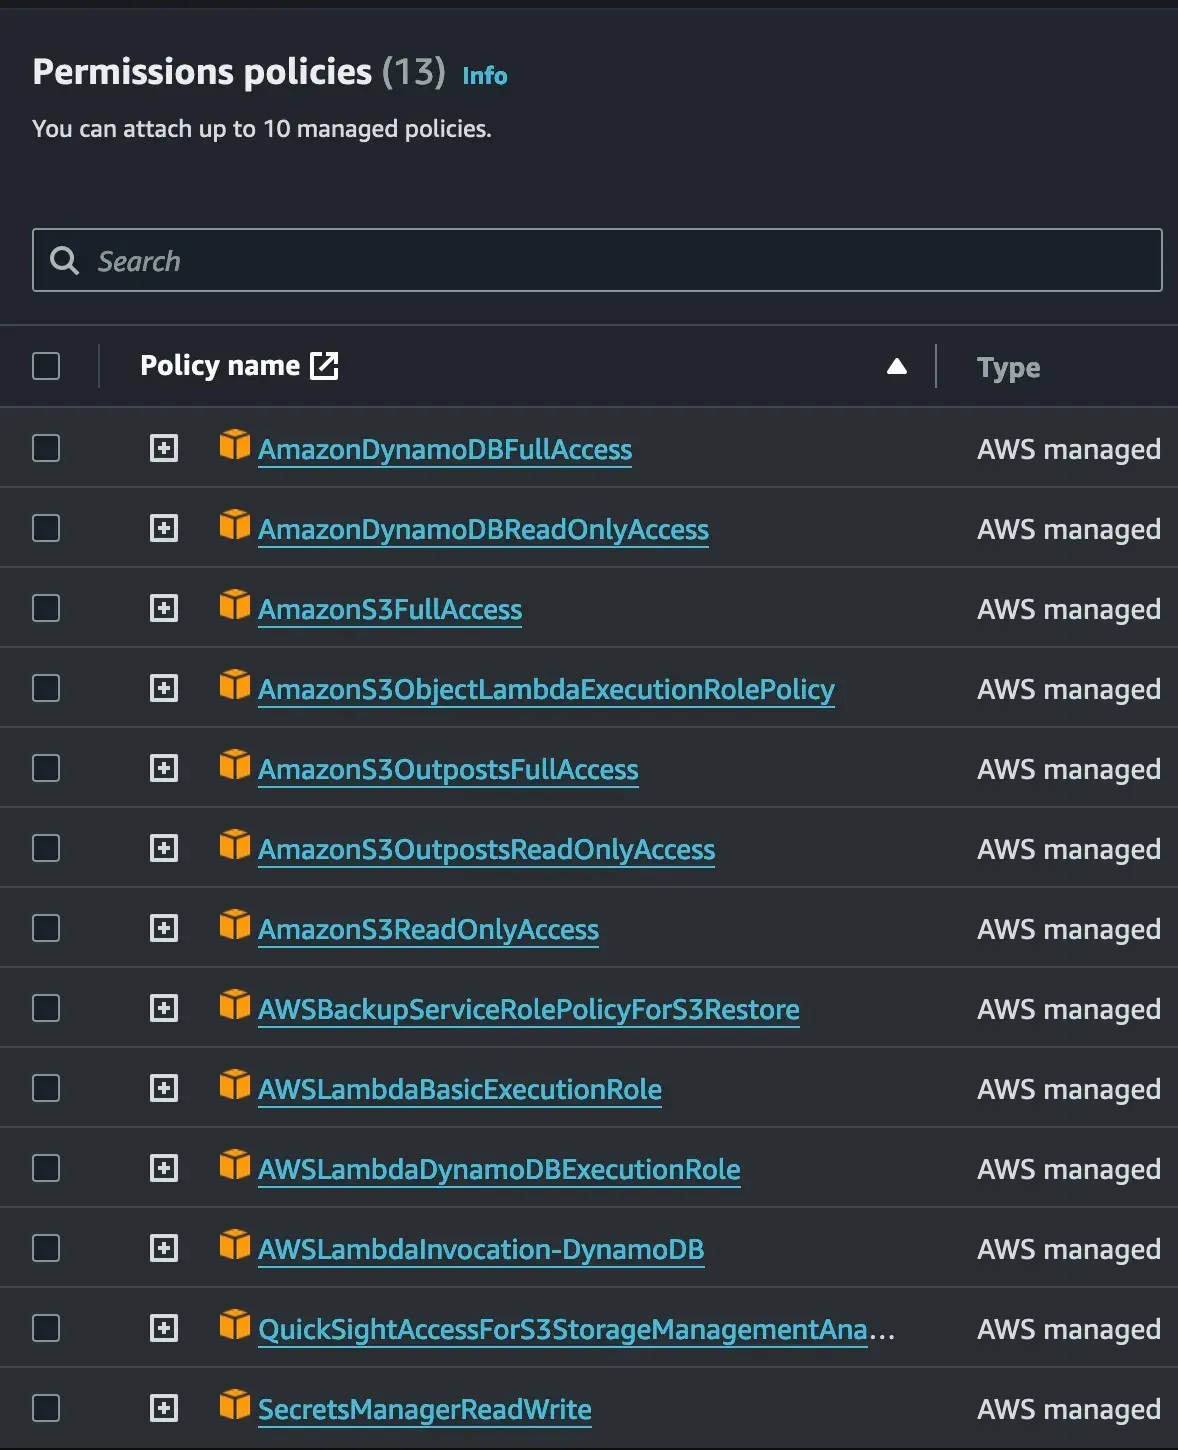
IAM Role
Go to the AWS console and search for IAM. Click on Roles and search for the role that was created by Terraform.
You should see a role named lambda_role. Click on it and attach the following policies that will allow your Lambda function to interact with other AWS services:
Create a new Function URL
To receive messages from Telegram, you need to set up a webhook. You can do this by sending a request to the Telegram API, but
first, you need to have a public URL for your lambda function. Recently, AWS introduced the Function urls that allows you to create
a public URL for your Lambda function.
Go to the AWS console, search for Lambda, click on Configuration, and then click on Function urls.
In here, you can create a new URL for your Lambda function. After the URL is created, you can use it to set up the Telegram webhook.
Set up the Telegram webhook
This is pretty simple, you just need to send a request to the Telegram API to set up the webhook. This webhook will tell telegram to send all the messages for the bot to the URL that you just created. You can do this by running the following command in your terminal:
curl https://api.telegram.org/botTOKEN/setWebhook\?url\=FUNCTION_URL/
Just replace TOKEN with the token that you received from the BotFather and FUNCTION_URL with the URL that you received from AWS.
Setting up the Secrets Manager
One more thing that you need to do is to set up the Telegram token in the Secrets Manager.
Go to the AWS console, search for Secrets Manager, and click on Store a new secret. Name it telegram/bot_token and add a new key-value pair
with the key TELEGRAM_TOKEN and the value the token that you received from the BotFather.
Testing the Lambda function
If everything was configured correctly, you can test the Lambda function by sending a message to your bot on Telegram. It should respond with the same message that you sent.
Conclusion
In this guide, I showed you how to set up and deploy a Telegram bot as a Lambda function with free resources, using Terraform. If you encounter any issues, feel free to ping me and I will gladly help you. You can find me on my socials in the footer of this website.